How to Manage the Digital Library in the Digitally – Digital Products App
A complete guide to managing files, license keys, custom links, and PDF stamping templates in the Digitally – Digital Products app to streamline your digital product creation.
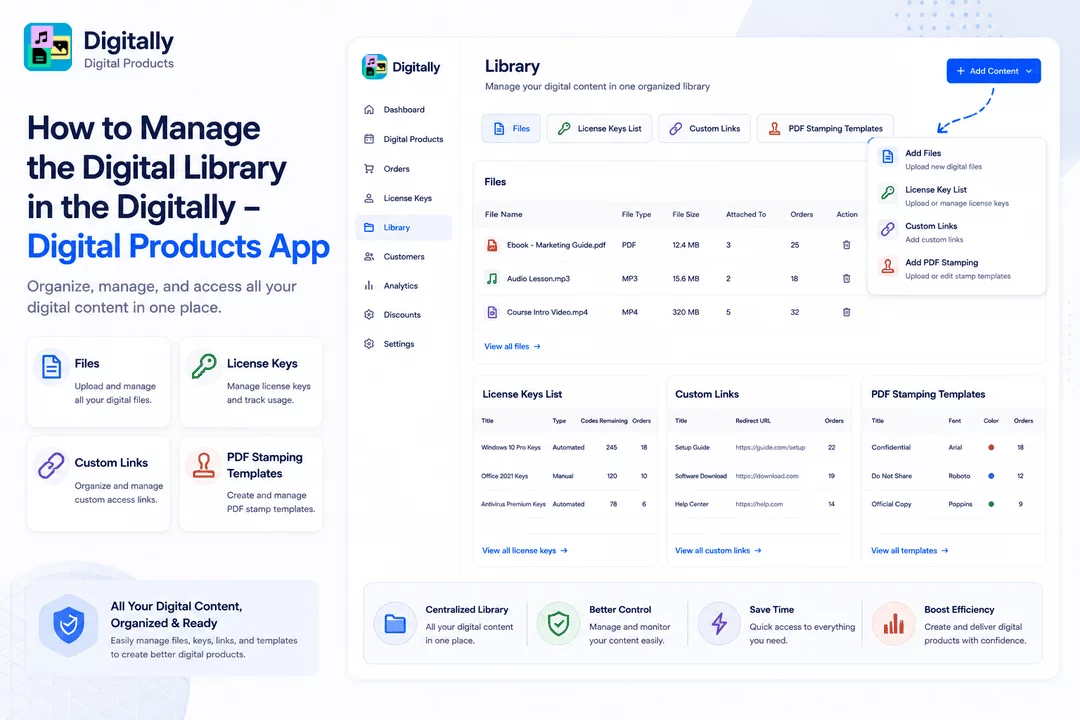
The Digitally – Digital Products app makes it easy to organize and manage all your digital content. Here's how to efficiently manage your Digital Library to ensure you can access and use your files, license keys, custom links, and PDF stamping templates.
✅ Step 1: Open the Library Page
Start by opening the Digitally – Digital Products app and navigating to the Library page.
This page is where you’ll find all your digital content, including files, license keys, custom links, and PDF stamping templates.

✅ Step 2: Explore the Four Main Sections
The Library page is divided into four key sections, each serving a specific purpose:
1. Files
- Click Files to see a list of all files you've uploaded when creating digital products.


- The table shows:
- File Name
- File Type
- File Size
- Attached To (how many products this file is used in)
- Orders (how many orders contain this file)
- Action (delete if needed)

Want to add new files? Check out this guide:
👉How to Add/Upload Digital Files in Digitally - Digital Products
2. License Keys List
- Click License Keys List to see all your license keys in one place.

- The table shows:
- Title (of the license key)
- License Type (automated or manual)
- Codes Remaining (how many keys are left)
- File (if a file is associated, you can download it)
- Paste Codes (for manually added codes)
- Attached To (how many products use this key)
- Orders (how many orders have used this key)
- Actions: Edit, Load Licenses (upload more), or Delete

To learn how to upload license keys, see this guide:
👉 How to Upload License Keys in Library in Digitally - Digital Products
3. Custom Links
- Click Custom Links to manage all custom links associated with your products.

- The table shows:
- Title (for the custom link)
- Redirect URL (where it leads)
- Link Details
- Attached To (how many files use this link)
- Orders (how many orders include this link)
- Actions: Edit or Delete

For detailed instructions on adding custom links, check this guide:
👉How to Add Custom Links to the Library in Digitally - Digital Products
4. PDF Stamping Templates
- This section is for managing templates for stamping PDFs with text. Click on the PDF Stamping Templates button.

- The table shows:
- Title (of the template)
- Font (used in the stamp)
- Text Color
- Page Layout
- Stamp Text (what text appears on the stamp)
- Attached To (how many files use this template)
- Actions: Edit or Delete

To learn more about PDF stamping, see the full guide:
👉How to Add/Edit PDF Stamping Templates in Digitally - Digital Products
✅ Step 3: Add New Content to Your Library
At the top-right of the Library page, click the Add Content button.

This will open a modal with the following options:
- Add Files: Upload new digital files.
- License Key List: Upload or manage license keys.
- Custom Links: Add new custom links for future product creation.
- Add PDF Stamping: Upload or edit your PDF stamping templates.

Each of these tasks is covered in detail in the guides above.
🎉 You’re Done!
Now you know how to efficiently manage your Digital Library in the Digitally – Digital Products app. With all your content organized, you can easily create digital products and ensure a smooth experience for your customers.