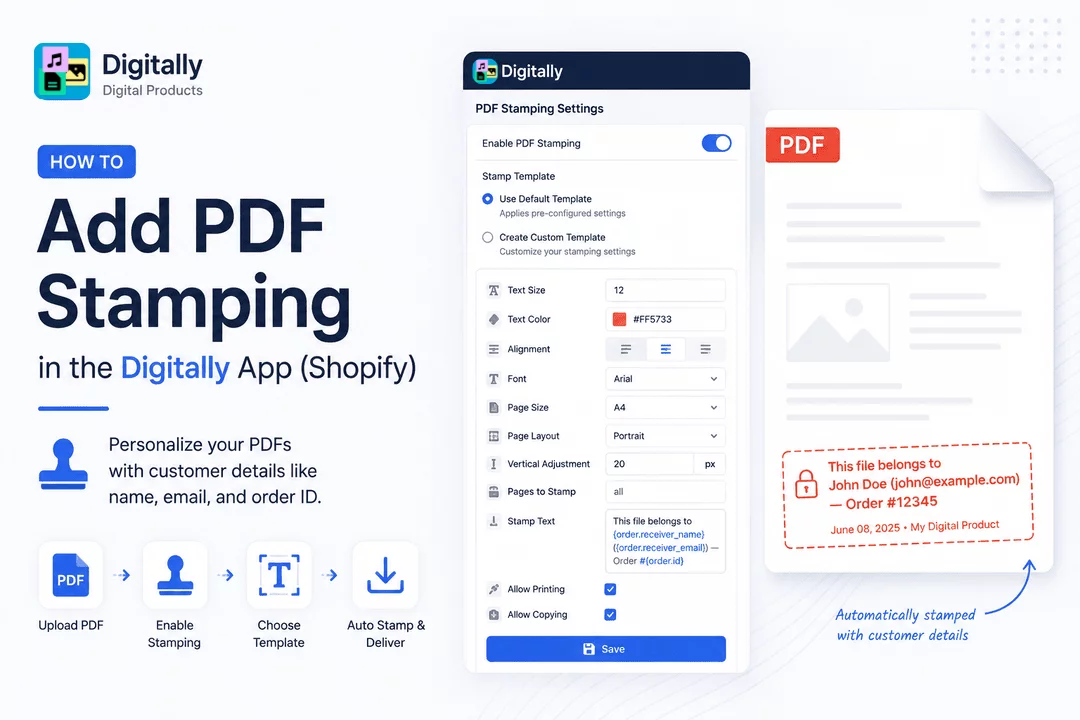
Give your digital products a personalized touch by enabling PDF stamping with customer details like name, email, and order ID. Follow the steps below to set it up using the Digitally – Digital Products app.
🔹 Step 1: Open the Digitally App
- In your Shopify admin, go to Apps
- Click Digitally – Digital Products to open the app

🔹 Step 2: Create a New Digital Product
- Click ➕ Create New Digital Product

🔹 Step 3: Browse & Link a Shopify Product
- Click Browse Product

- Select the product you want to deliver digitally
- Click Save

🔹 Step 4: Upload Your PDF File
- Click Add Files

- Choose your PDF file from your computer and upload it
🔹 Step 5: Enable PDF Stamping
- Go to PDF Stamping Settings
- Enable PDF Stamping

🔹 Step 6: ✏️ Choose a PDF Stamping Template
✅ Option 1: Use Default Template
- Applies pre-configured stamping settings automatically
- Click here to learn how to edit the default template

✨ Option 2: Create a Custom Template
- Click Add Custom Template
- Customize the stamping settings (details below)

🛠 Custom Template Settings
Text Size Set the font size for the stamped text.

Text Color Enter a hex color code (e.g., #FF5733) to define the text color.

Alignment Choose the position of the stamp: Left, Center, or Right.

Font Select a font from the available options: Arial, Times New Roman, or Courier.

Page Size Set the size of the PDF pages — choose A4 or Letter, based on your document's format.

Page Layout Choose the layout orientation of the PDF: Portrait or Landscape.

Vertical Adjustment Define how far the stamp appears from the bottom of the page (margin adjustment).

Pages to Stamp Specify which pages to apply the stamp to — enter specific page numbers (e.g., 1,2) or use all to stamp every page.

Stamp Text Add personalized content using dynamic variables (see below for options).

🔄 Dynamic Variables for Stamp Text
You can personalize each PDF by using the following dynamic variables. These placeholders will automatically populate with customer and order details at the time of purchase:
{order.receiver_name} → Customer Name
{order.receiver_email} → Customer Email
{order.id} → Order ID
{order.date} → Order Date
{product.name} → Product Name
Example Stamp Text:
This file belongs to {order.receiver_name} ({order.receiver_email}) — Order #{order.id}
🔐 Additional PDF Permissions (Optional)
Option Effect
✅ Allow Printing Lets the customer print the stamped PDF
✅ Allow Copying Allows text copying from the PDF
✅ Final Step: Save Your Settings
Once you've configured all settings:
- Click Save to apply your PDF stamping setup

📥 What Happens After Purchase?
When a customer buys your digital product:
- The stamped PDF is automatically generated with their personal details.
- They can download the file directly from:
- The checkout confirmation page
- The email receipt sent to their inbox
The final stamped PDF will look something like this: