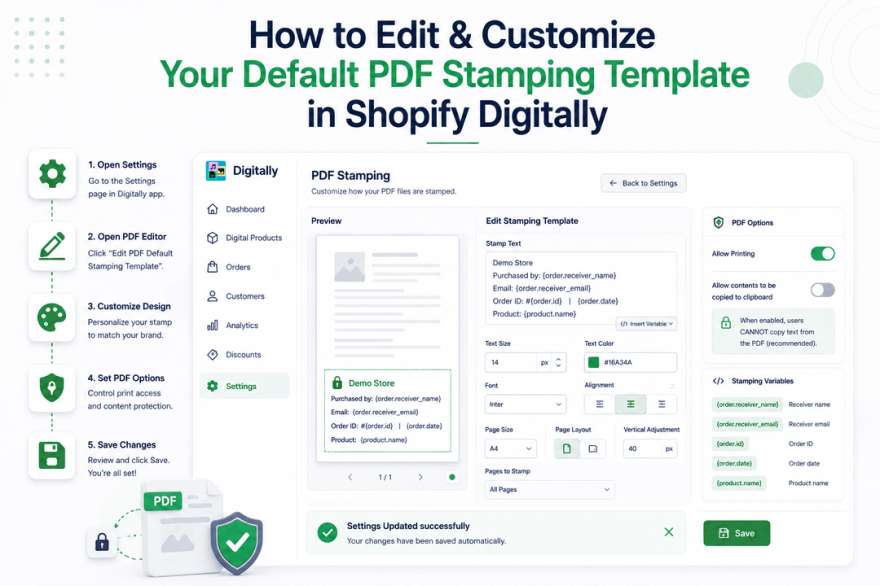
Make your PDFs look exactly how you want—branded, protected, and professional. Follow these simple steps to customize your PDF stamping template in the Digitally – Digital Products Shopify app.
🔧 Step 1: Navigate to the Settings Page
- Open the Digitally – Digital Products app from your Shopify admin dashboard.
- On the app's main screen, look for the Settings tab in the left-hand menu or top navigation bar.
- Click on Settings to proceed.

💡 Pro Tip: Bookmark the Digitally app for quick access when you're frequently updating your PDF templates.
✏️ Step 2: Open the PDF Template Editor
- In the settings page, locate the section called PDF Stamping.
- Click on the button that says Edit PDF Default Stamping Template.

👀 Heads-up: This opens the live editor where your changes will be previewed in real time.
🎨 Step 3: Customize the PDF Stamping Design
You'll see a preview panel on the left and an editing panel on the right. Use the editor to personalize your stamping details.
Here’s what you can customize:
- Text Size: Adjust the font size to make it bold or subtle.
- Text Color: Pick a color that matches your brand identity. (Hex codes supported!)
- Alignment: Choose whether the stamp appears left, center, or right aligned.
- Font: Select from available font styles to match your design.
- Page Size: Set to A4, Letter, or any standard format.
- Page Layout: Choose between Portrait or Landscape.
- Vertical Adjustment: Fine-tune the margin from the bottom (in pixels) to position your stamp perfectly.
- Pages to Stamp: Select specific pages (e.g., first page only, all pages, etc.)

✅ Pro Tip: Want to include a buyer's name or email? Use dynamic tags like this:
Stamping variables:
Below are the available stamping variables that can be replaced in stamping text.
- {order.receiver_name} for Receiver name - the customer name
- {order.receiver_email} for Receiver email - the customer email
- {order.id} for the order ID
- {order.date} for the order date
- {product.name} for the stamped product name
🔐 Step 4: Set PDF Access Permissions
Scroll to the PDF Options section in the same editor panel:
- ✅ Allow Printing: Toggle ON if you want customers to print the PDF.
- 🚫 Allow contents to be copied to clipboard:
- Enabled = Users CANNOT copy text (recommended for copyright protection).
- Disabled = Users CAN copy text (useful for editable resources).

🔐 Pro Tip: Disabling copy-to-clipboard is a great way to protect your content, especially for eBooks and digital guides.
💾 Step 5: Save Your Changes
Before you leave the editor:
- Double-check your layout and permission settings.
- Click the Save button at the bottom right of the editor.

💡 Pro Tip: Test your changes by generating a sample stamped PDF before publishing live. This ensures everything appears exactly as intended.
🎉 That’s It! You’re Done.
Your new default PDF stamping template is now live and ready to be applied automatically to all your digital downloads.